
It is very common for the C drive to run out of space in Windows Server 2016, 2019, 2022, and previous versions. In this situation, you can try to reclaim disk space instead of replacing the disk with a new one. This article shows how to free up disk space in Windows Server 2016 using the native Disk Cleanup utility and four additional methods. If you still cannot obtain sufficient free space, you should add more free space to the C drive from other partitions on the disk.
Free Up Disk Space with Server 2016 Disk Cleanup Utility
To free up disk space in Windows Server 2016, the primary choice is the Windows native Disk Cleanup utility. Although many third-party disk cleanup and optimization software tools are available, Windows Disk Cleanup is highly recommended because it is safe and can effectively clear out multiple types of junk files.
Steps to free up disk space in Windows Server 2016 with Disk Cleanup:
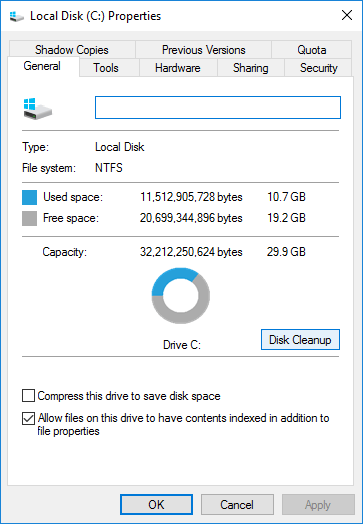
- Press Windows + E together on your keyboard to open File Explorer, right-click the C drive, and select Properties.
- Click Disk Cleanup in the pop-up window.
 ---
---
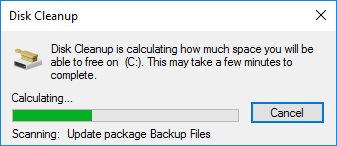
- Wait for Disk Cleanup to scan for files that can be safely removed. (The scanning time depends on the server's performance and the total amount of junk files.)
![Scanning]()
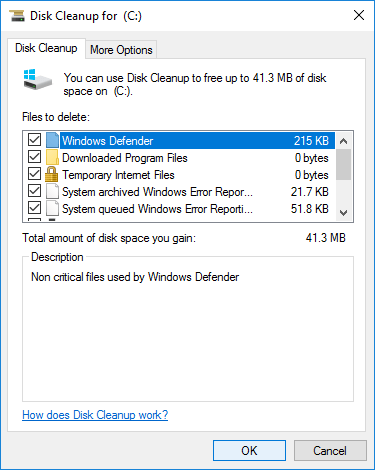
- Check the boxes next to the files you want to delete, and then click OK. (If you are unsure about a specific file type, click on it to read its description at the bottom.)
![Select files]()
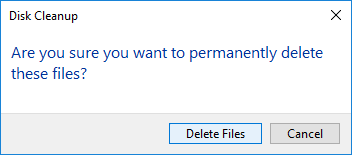
- Click Delete Files in the pop-up window to confirm and start the deletion process.
![Confirm]()
If you prefer to use the command line, please refer to how to run Disk Cleanup from CMD.
For servers that have never been cleaned or have not had disk space freed up for a long time, the Disk Cleanup utility can help reclaim several gigabytes of space. If you still cannot obtain enough free space, proceed with the four additional methods to reclaim more disk space on your Windows Server 2016.
Additional Methods to Free Up Space in Windows Server 2016
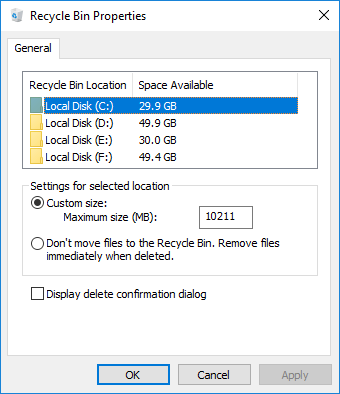
1. Reduce Recycle Bin Size
All files deleted by pressing the DEL key without holding the SHIFT key are moved to the Recycle Bin. You can manually restore these files to their original locations if they were deleted by mistake. Because the Recycle Bin occupies space on the C drive by default, accumulating files in it reduces the available free space on the C drive.
You can reduce the allowed size or change the location of the Recycle Bin to another, larger partition.
- Right-click the Recycle Bin icon on your desktop.
- Select the specific drive you want to configure for the Recycle Bin.
- Choose Custom size, enter your preferred maximum amount of space, and click OK to confirm.
2. Reconfigure Paging File
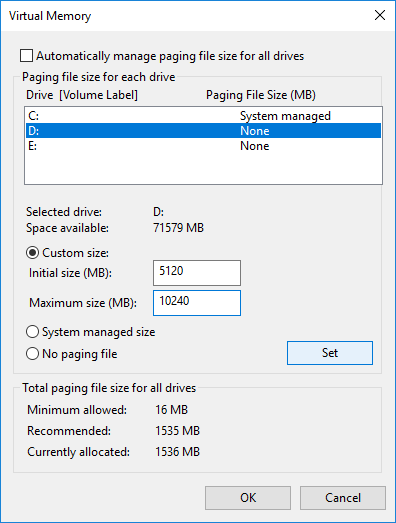
The paging file uses a portion of disk space as virtual RAM, and it is also located on the C drive by default. You can move it to another partition when the C drive is running out of space. Follow these steps:
- Press Windows + R to open the Run dialog box, type sysdm.cpl,3, and press Enter.
- Click Settings under the Performance section at the top of the System Properties window.
- In the Performance Options window, switch to the Advanced tab and click Change under the Virtual memory section.
- Uncheck "Automatically manage paging file size for all drives", select the C drive, choose "No paging file", and click "Set". Next, select the D drive (or another target drive), choose "Custom size", enter an appropriate value, and click "Set". Click OK to confirm. (A system reboot is required for these changes to take effect.)
3. Delete Shadow Copies
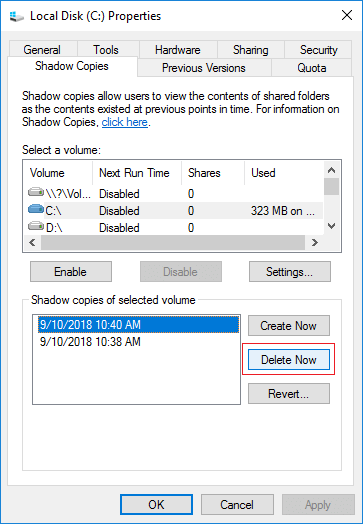
If you have enabled Shadow Copy on your system, you can delete previous backup copies to release space.
- Open Windows File Explorer.
- Right-click the C drive, click Properties, and switch to the Shadow Copies tab.
- Select the outdated or previous copies from the list and click Delete Now.
4. Uninstall Unused Programs
Press Windows + X on your keyboard, select Programs and Features, and uninstall any programs that you no longer require.
Reclaiming less than 20GB of space is usually insufficient. Available disk space is quickly consumed by newly generated junk files. As a result, many users find that their C drive quickly becomes full again.
To completely resolve this problem, it is highly recommended to allocate more free space and expand the C drive's capacity. This situation is similar to using a smartphone: if you use a 16GB device, you must constantly delete files and clean up storage; however, you will rarely encounter this storage issue if you upgrade to a 128GB or 256GB device.
Add Free Space to C Drive After Cleaning Up Disk Space
If unused free space is available in other volumes on the same disk, you can shrink those volumes to generate unallocated space, which can then be added directly to the system C drive. The operating system, installed programs, and all data will remain completely intact.
Download NIUBI Partition Editor and follow the steps demonstrated in the video tutorial to increase C drive free space in Windows Server 2016:

The configuration steps remain identical whether you are using an SSD/HDD, any type of hardware RAID array, or virtual disks within VMware/Hyper-V virtual machines.
In Summary
To free up disk space in Windows Server 2016, you can use either the built-in Windows Disk Cleanup utility or reliable third-party software. However, in most scenarios, standard cleanups do not yield a significant amount of free space. If you cannot secure more than 20GB of free space, your best option is to add space from other existing volumes using NIUBI Partition Editor. In addition to shrinking and extending partitions, this tool enables you to move, merge, copy, convert, defragment, hide, optimize, and wipe partitions, as well as scan for bad sectors and perform various other disk management tasks.
 © 2009 - NIUBI Technology All Rights Reserved. |