Similar to legacy Windows releases, the primary partition in Windows Server 2019 frequently runs out of disk space. While managing data drives allocated for backups or projects is relatively straightforward, resolving storage issues on the system C drive is considerably more complex. This guide demonstrates how to free up disk space in Windows Server 2019 by using native utilities to clean up disk clutter and eliminate redundant files. If these maintenance methods do not reclaim sufficient free space, expanding the system volume by allocating free space from alternative partitions remains the recommended solution.
1. Run Windows Server 2019 Disk Cleanup Utility
Consistent with previous releases, Windows Server 2019 includes the native Disk Cleanup utility to help administrators free up disk space effectively. This built-in tool scans the system volume to identify and eliminate redundant temporary files and system logs safely. Retaining a familiar interface and straightforward workflow across multiple operating system generations, this utility provides a fast, reliable, and inherently secure method to clean up disk drives without compromising system stability.
Step-by-step guide to free up disk space in Windows Server 2019:
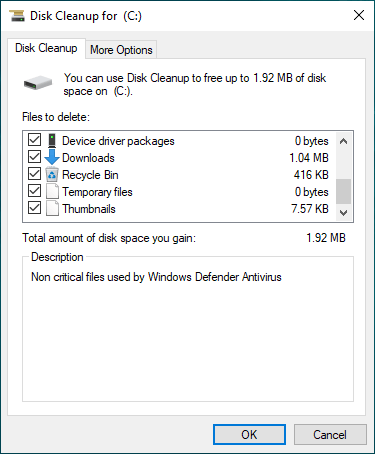
- Press the Windows key + R simultaneously on your keyboard, type cleanmgr, and press Enter.
- Select the C drive from the drop-down menu and click "OK".
- Select the checkboxes next to the specific file categories you wish to eliminate.
- Click "OK" to authorize the utility to safely clean up disk clutter and delete redundant files.
To streamline future maintenance and avoid selecting categories manually, you can follow these instructions to clean up disk storage automatically via the command line.
On a newly deployed server, the volume of reclaimable storage is typically minimal due to the lack of accumulated temporary files. In contrast, production systems that have operated for extended periods without maintenance often store massive amounts of redundant data. Running Disk Cleanup on these servers can often reclaim tens of gigabytes of free space. If you are unable to reclaim at least 20 GB of storage space through this utility, consider implementing the additional optimization methods detailed below.
2. Additional Options to Free Up Disk Space in Server 2019
1. Delete Shadow Copies
If Volume Shadow Copy is enabled on your system, removing outdated snapshots is an excellent way to free up disk space. To safely delete these older versions and recover disk space, follow the steps below:
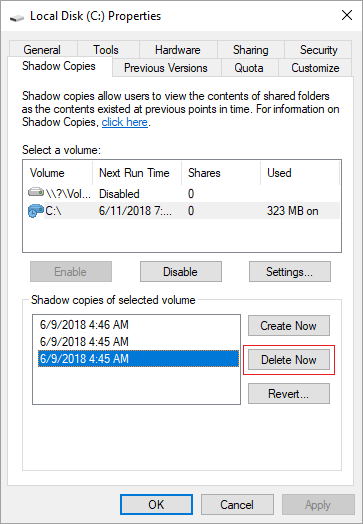
- Open Windows File Explorer.
- Right-click the C drive, select "Properties", and switch to the "Shadow Copies" tab.
- Select the previous backup copies from the listed entries and click "Delete Now" to reclaim disk space.
2. Reset Recycle Bin
By default, files deleted using the standard delete command are temporarily moved to the Recycle Bin, allowing for manual restoration if necessary. Because the Recycle Bin allocates a specific percentage of the C drive's total space by default, an accumulation of deleted items will gradually decrease available storage. Periodically purging these accumulated files is an excellent habit to clean up disk clutter and maintain optimal server performance.
To prevent the system volume from running low on storage, you can reduce the maximum space allocation or reconfigure the retention settings for different partitions:
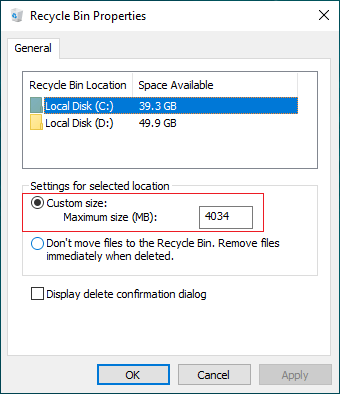
- Right-click the Recycle Bin icon on your desktop and select "Properties".
- Select the specific drive volume from the listed storage locations.
- Choose the "Custom size" option and enter a lower maximum capacity in megabytes, or opt to bypass the bin entirely to free up disk space immediately upon deletion.
3. Reset Page File
The page file (pagefile.sys) acts as secondary virtual memory and is stored on the C drive by default. Relocating this file to an alternative partition is an effective way to free up disk space when the system volume experiences low storage capacity. Follow these procedural steps to modify the configuration:
- Press the Windows key + R on your keyboard to open the Run dialog box, type sysdm.cpl, and press Enter.
- In the System Properties window, navigate to the Advanced tab and click "Settings" under the Performance section.
- Switch to the Advanced tab within the newly opened Performance Options window, then click "Change" under the Virtual memory section.
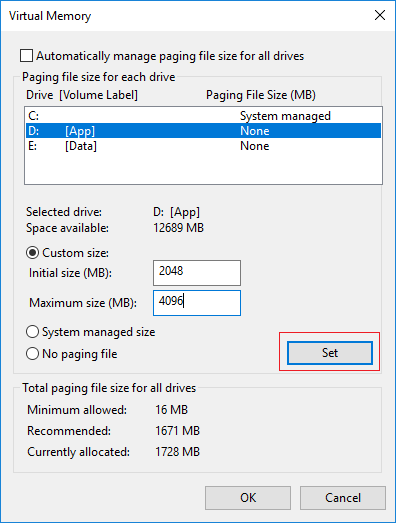
- Clear the checkbox for "Automatically manage paging file size for all drives" located at the top of the interface.
- Select the D drive (or an alternative available volume), choose the "Custom size" option, input your preferred Initial and Maximum size values in megabytes, and then click "Set".
- Select the C drive, opt for the "No paging file" radio button, and click "Set" to free up space on the primary partition.
- Click "OK" across the open configuration windows to confirm. A system reboot is required for these modifications to take effect.
4. Uninstall Unnecessary Applications
Removing unused or redundant software is a highly straightforward approach to clean up disk storage and reclaim space. This includes applications that are no longer required or programs preinstalled by the manufacturer during initial deployment.
- Open the Settings menu.
- Navigate to Apps > Apps & features.
- Select the specific applications you want to remove from the list and click "Uninstall".
5. Relocate New Content Storage Paths
To prevent future data accumulation from crowding the system volume, you can modify the default save directories for applications, documents, media, and downloads, ensuring these file categories target alternative data partitions automatically.
- Open the Settings menu.
- Navigate to System > Storage.
- Under the "More storage settings" section, click "Change where new content is saved".
- Use the drop-down menus to assign alternative partition locations for each data category.
6. Reconfigure Application Output Directories
By default, most software installations and system processes export their data directly to the system volume. Heavy database workloads, virtual machines, video rendering projects, and native Windows services generate massive temporary exports, making it essential to redirect default output paths to high-capacity auxiliary drives to free up disk space effectively.
7. Enable and Configure Storage Sense
The Storage Sense feature acts as an automated maintenance utility to free up disk space continuously when system volumes encounter low storage thresholds. It runs in the background to automatically purge temporary setups, empty the Recycle Bin, and clear stale system logs.
- Open the Settings menu.
- Go to System > Storage.
- Locate the Storage Sense toggle on the configuration panel and switch it from Off to On.
3. Allocate Additional Free Space from Alternate Partitions
While cleaning up the disk is helpful, it rarely provides a long-term solution. To completely resolve the low disk space issue on the C drive, the most effective method is to allocate free space from other partitions on the same disk.
Although disk partitions are already allocated, you can easily change partition size configurations without experiencing data loss. Using reliable partition software, you can safely shrink a data volume to create Unallocated space, and then merge it into the C drive. This expands the system partition while keeping the operating system, programs, and data entirely intact.
Download NIUBI Partition Editor and watch the step-by-step video tutorial below to modify your drive configuration:

- The utility operates in Virtual Mode first; real disk configurations will not be modified until you click "Apply" to confirm the pending operations.
- If your server utilizes hardware RAID arrays, do not break the array configuration or modify the RAID controller; simply follow the standard steps demonstrated in the video.
- If the physical disk is completely full, you can clone the disk to a larger drive and expand the C drive using the extra space.
Beyond quickly and significantly reallocating disk space to the C drive in Windows Server 2019 and legacy editions, NIUBI Partition Editor provides a comprehensive toolkit to clone, convert, merge, wipe, and hide partitions, as well as optimize file systems and scan for bad sectors.