When disk partitions run out of space in Windows Server 2019, you need to resize partition to solve this issue. Otherwise, you will have to spend a long time recreating partitions and restoring everything from backup. To resize Server 2019 partition without losing data, there are two kinds of tools - Windows native Disk Management and third-party partition software. Although there are "Shrink Volume" and "Extend Volume" functions in Disk Management to help change partition size, it is not the best choice due to its strict limitations. This article explains how to resize partition in Windows Server 2019 with both tools.
1. Resize Partition in Windows Server 2019 Disk Management
It is not difficult to adjust partition size in Windows Server 2019 via Disk Management, but as mentioned above, it has many restrictions. In short, it can only help you shrink an NTFS partition to create a new volume, and extend an NTFS partition after deleting the adjacent volume on the right. If you want to extend a partition by shrinking another one or resize FAT32 partitions, server partition software is needed.
Restrictions to resize Server 2019 partition with Disk Management:
- Only NTFS partitions can be resized; FAT32 and any other types of partitions are not supported.
- It can only shrink a partition toward the left and create unallocated space on the right.
- It can only shrink a small amount of space when there are unmovable files located in the partition.
- It can only extend a partition when there's contiguous unallocated space on the right.
When resizing a partition in Server 2019 via the Disk Management tool, it cannot change the start position of the volume. This is the reason why it can only shrink a volume from right to left, and extend a partition by merging contiguous unallocated space on the right.
How to Resize Partition in Windows Server 2019 with Disk Management:
① How to shrink partition:
- Press Windows + X on the keyboard and click Disk Management in the list.
- Right-click a NTFS partition and select "Shrink Volume".
- Enter an amount of space and click the "Shrink" button. If you do not enter an amount manually, the maximum available space will be used by default.
② How to extend partition (such as C:):
- Right-click the adjacent partition D: in Disk Management and select "Delete Volume", then its disk space will be changed to Unallocated.
- Right-click the C: drive and select "Extend Volume".
- Click "Next" until "Finish" in the pop-up Extend Volume Wizard window.
Caution: Do not delete D if you installed programs or any Windows services on it.
Many administrators find that they cannot shrink D to extend the C drive. This is because to extend C drive in Server 2019 via Disk Management, there must be adjacent Unallocated space on the right side. Disk Management can only shrink a partition towards the left and create Unallocated space on the right. Therefore, this Unallocated space is non-adjacent to the C drive, causing the "Extend Volume" option to be greyed out.

To resize partitions in Windows Server 2019/2022 and previous versions, third-party software is a much better choice. It can make Unallocated space on either the left or right side when shrinking a partition, and merge it into contiguous or non-adjacent partitions.
2. Take Care of Data while Resizing Server 2019 Partitions
Resizing partitions requires updating the partition table and file system. Any software error or hardware issue (like a power outage) during this process can cause system boot failure or data loss. Therefore, always back up your server first and use safe partition software.
Compared to other tools, NIUBI Partition Editor provides unique data protection technologies and faster processing speeds:
- Virtual Mode – All operations are listed as pending for preview. Real disk partitions won't be modified until you click "Apply" to confirm.
- Cancel-at-will – You can cancel ongoing operations safely at any progress without losing data or damaging partitions.
- 1-Second Rollback – If any known error is detected while modifying partitions, it automatically reverts the server to its original status instantly.
- Hot Clone – Clone the system disk or data partition without interrupting the server. You can boot from the cloned disk immediately if the primary disk fails.
- Advanced file-moving algorithm – 30% to 300% faster when shrinking, moving, or cloning partitions.
When shrinking a partition toward the right and moving a partition, all files in it will be moved as well. The more files in this partition, the longer it takes to move. With the help of its advanced file-moving algorithm, NIUBI Partition Editor is much faster.
3. Change Partition Size with Safe Partition Software
Download NIUBI Partition Editor, and you will see the main window with your disk partition structure. Available operations for the selected disk or partition are listed on the left and by right-clicking.
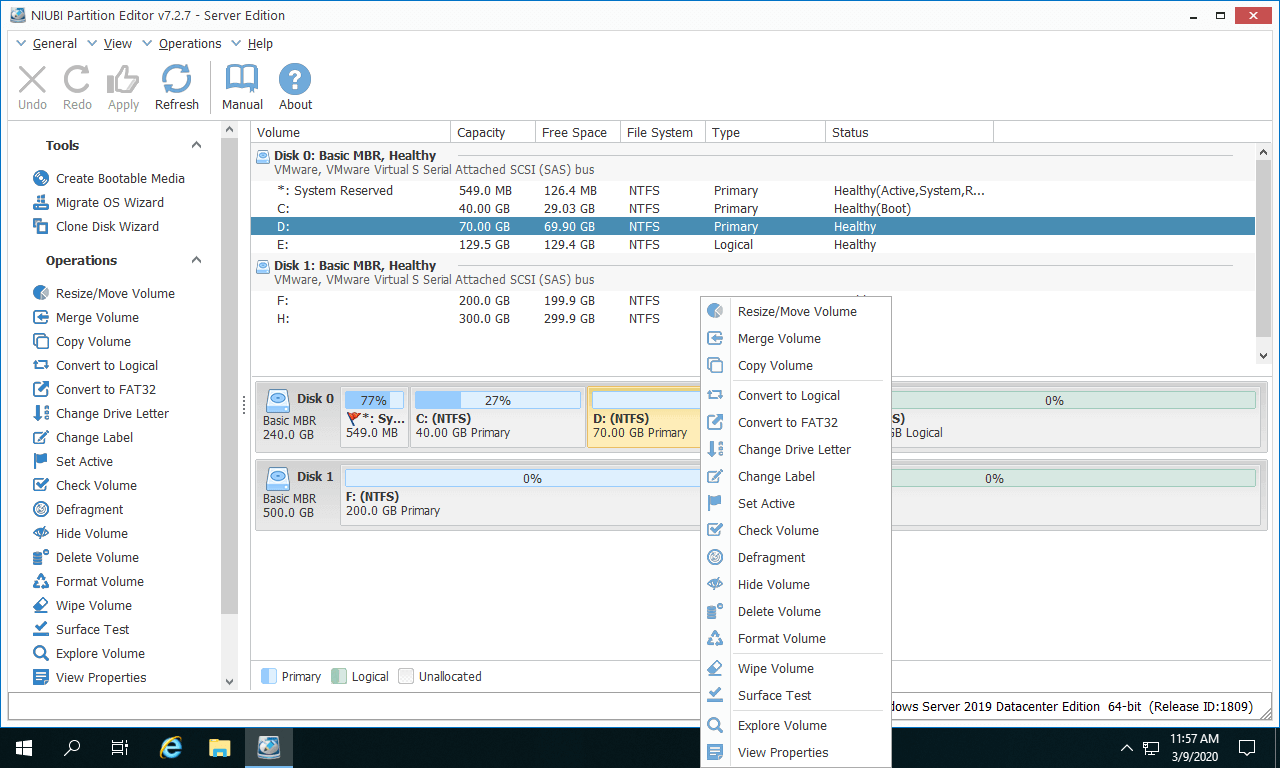
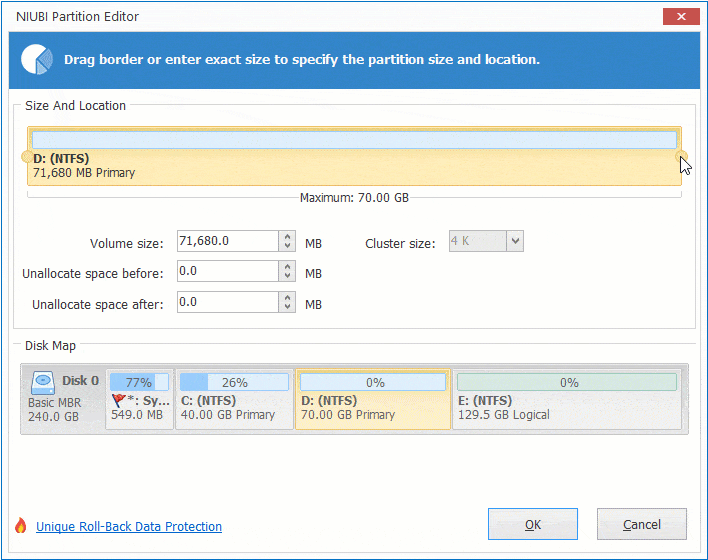
To resize partition in Windows Server 2019 without losing data: right-click an NTFS or FAT32 partition and select "Resize/Move Volume". You have 2 options in the pop-up window.
Option 1: Drag the left border towards the right to make Unallocated space on the left.
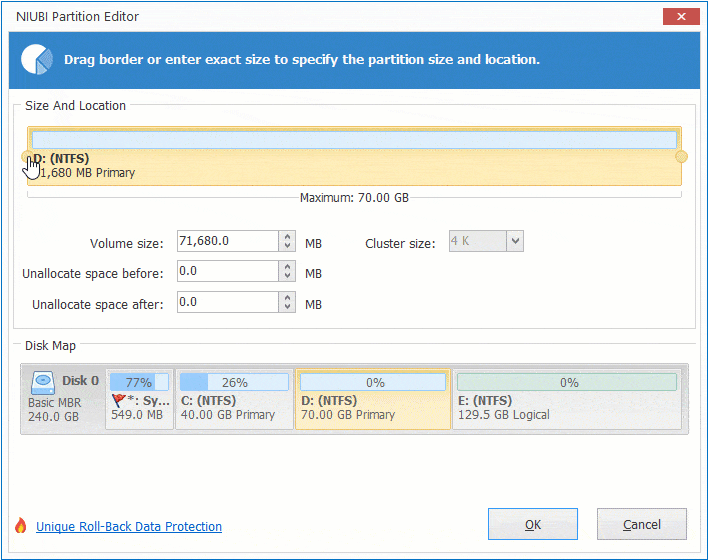
Option 2: Drag the right border towards the left to make Unallocated space on the right.
After shrinking a partition to get Unallocated space, you can create a new volume or extend another volume.
How to resize D and extend partition C in Windows Server 2019/2022:
- Follow Option 1 to shrink the D drive and make Unallocated space on the left.
- Right-click the C drive and select "Resize/Move Volume" again, drag the right border towards the right to combine this Unallocated space.
- Click "Apply" on the top left to execute.
Follow the steps demonstrated in the video.
- If you want to resize a non-adjacent partition (here is E:) to expand the C drive, there's an additional step to move Unallocated space to the left before adding it to the C drive.
- Follow the steps if you want to resize a partition and increase D drive space for Server 2019.
- No software can extend a partition by moving free space from another separate disk. If there's no available free space on this disk, follow the steps to copy disk to a larger one.
- If you want to resize a RAID partition in Windows Server 2019/2022, do not break the array or do any operations to the RAID controller; simply follow the same steps in the videos.
Beyond safely resizing partitions in Windows Server 2019, 2022, and other versions, NIUBI Partition Editor provides a comprehensive toolkit to clone, convert, merge, hide, and wipe partitions, as well as scan for bad sectors and optimize file systems.