
PowerShell is a task-based command-line shell and scripting language built on the .NET framework. It helps system administrators and power users rapidly automate tasks that manage operating systems and underlying processes. Since it helps system administrators automate many administration tasks, you may wonder if it is possible to manage disk partitions natively. The answer is yes. This article explains how to resize partitions with PowerShell in Windows Server 2019/2022 by safely shrinking or extending volumes.
How to Shrink Volume with PowerShell in Windows Server 2019/2022
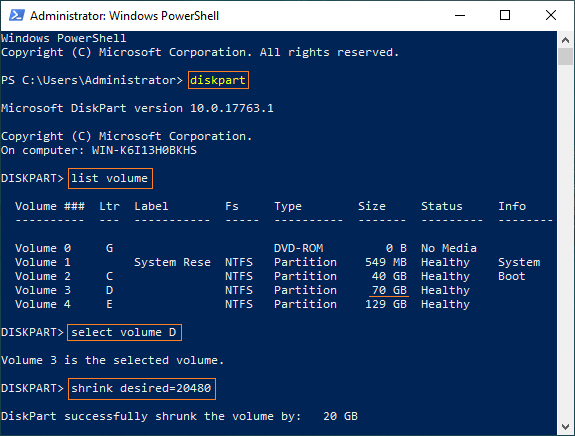
First, press the Windows key + X on your keyboard, then select Windows PowerShell (Admin) from the menu list.
Steps to shrink volumes with PowerShell in Windows Server 2019/2022:
- Type diskpart in the command window and press Enter to initialize the command-line disk tool.
- Type list volume and press Enter to view all available disk drives in a list.
- Type select volume D and press Enter. (Replace D with the number or drive letter of your target partition.)
- Type shrink desired=YY and press Enter to shrink the partition. (YY represents the specific storage value in megabytes.)
Immediately, the command window reports that the volume has been successfully shrunk.
Note: Only partitions formatted with the NTFS file system are supported by this native tool.
How to Extend Volume with PowerShell in Windows Server 2019/2022
If you want to expand a volume using commands, the process is not as straightforward as shrinking it. First, you are required to delete the adjacent partition on the right. If there is no adjacent space available or you cannot remove it, built-in features cannot complete the expansion.
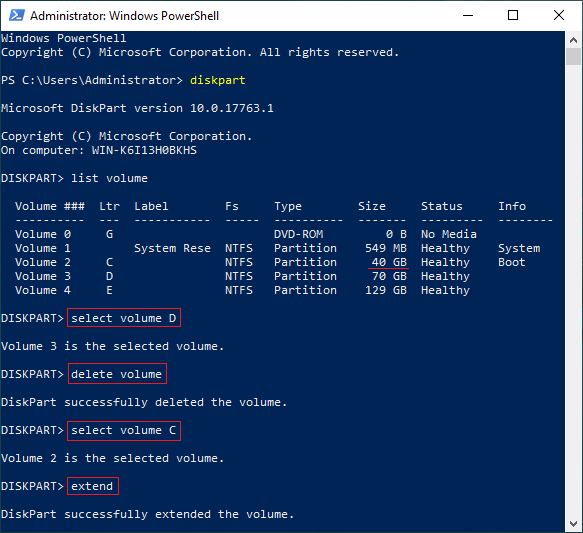
Steps to extend partition with PowerShell in Windows Server 2019/2022 by removing drives:
- Type diskpart in the PowerShell command window and press Enter to open the tool.
- Type select volume D and press Enter. (D represents the drive letter or drive number of the adjacent partition on the right.)
- Type delete volume and press Enter to permanently delete the partition to get Unallocated space.
- Type select volume C and press Enter. (C represents the number or drive letter of the target partition you want to expand.)
- Type extend and press Enter to extend the partition into the Unallocated space.
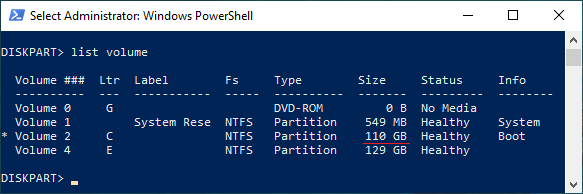
Run the list volume command again. As illustrated in the command window, the system C drive has been extended from 40GB to 110GB.
Limitations to Resize Partition with PowerShell in Windows Server 2019/2022
If you run the help shrink and help extend commands in DiskPart, you will see the exact limitations of resizing partitions.
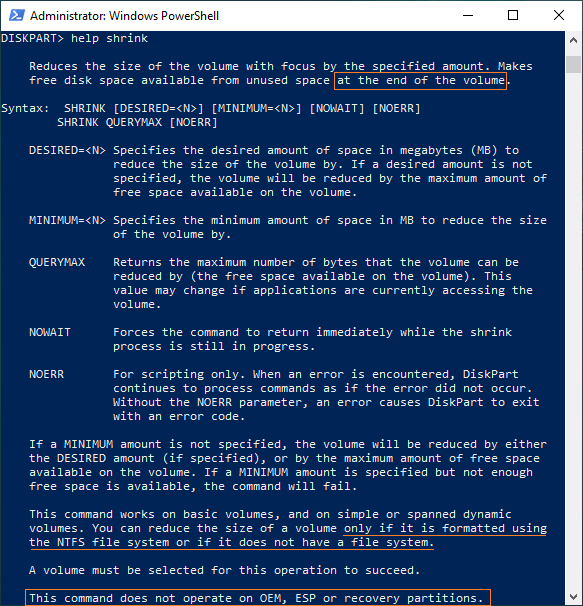
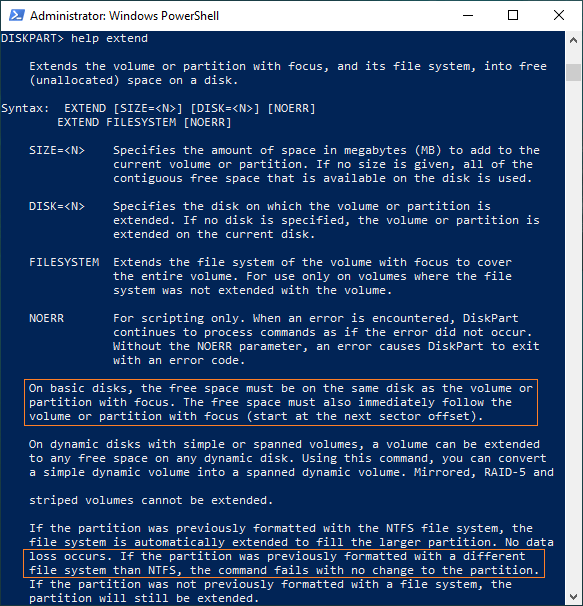
Limitations to resizing partitions with PowerShell in Windows Server 2019/2022:
- Only NTFS and RAW partitions can be shrunk and extended.
- Unallocated space can only be generated on the right side of the volume when shrinking a partition.
- When expanding a partition, contiguous Unallocated space must be on the right side and on the same disk.
- DiskPart cannot extend a partition by shrinking another one; you must delete the adjacent partition on the right.
Since the native Windows Server 2019 Disk Management shares the same limitations, running professional partition software is highly recommended. This allows you to bypass these restrictions and resize partitions without data loss.
Download NIUBI Partition Editor and follow the steps in the videos below to resize partitions safely.
How to extend system partition C by shrinking other volume:
How to extend D drive by shrinking other partition:
Beyond resizing partitions, NIUBI Partition Editor helps you perform many other disk and partition management operations.
 © 2009 - NIUBI Technology All Rights Reserved. |