
Sometimes you may need to move a partition in Windows Server 2016, but the Windows native Disk Management utility or Diskpart command-line tool cannot perform this action. To accomplish this task, reliable disk partition software is required. Moving partitions with unreliable software poses a potential risk of system damage and data loss. Therefore, it is highly recommended to create a backup in advance and use a safe utility. This article introduces detailed steps to move a partition in Server 2016 to the left or right side, or to transfer it to another disk entirely without data loss.
How to Move Partition D to the Right and Expand the C Drive
Windows Server 2016 provides Shrink Volume and Extend Volume functions within the Disk Management snap-in. When the C drive is running out of space, many administrators attempt to extend the C drive by shrinking D. However, they soon discover that they cannot extend the C drive after shrinking D because the Extend Volume option remains greyed out.
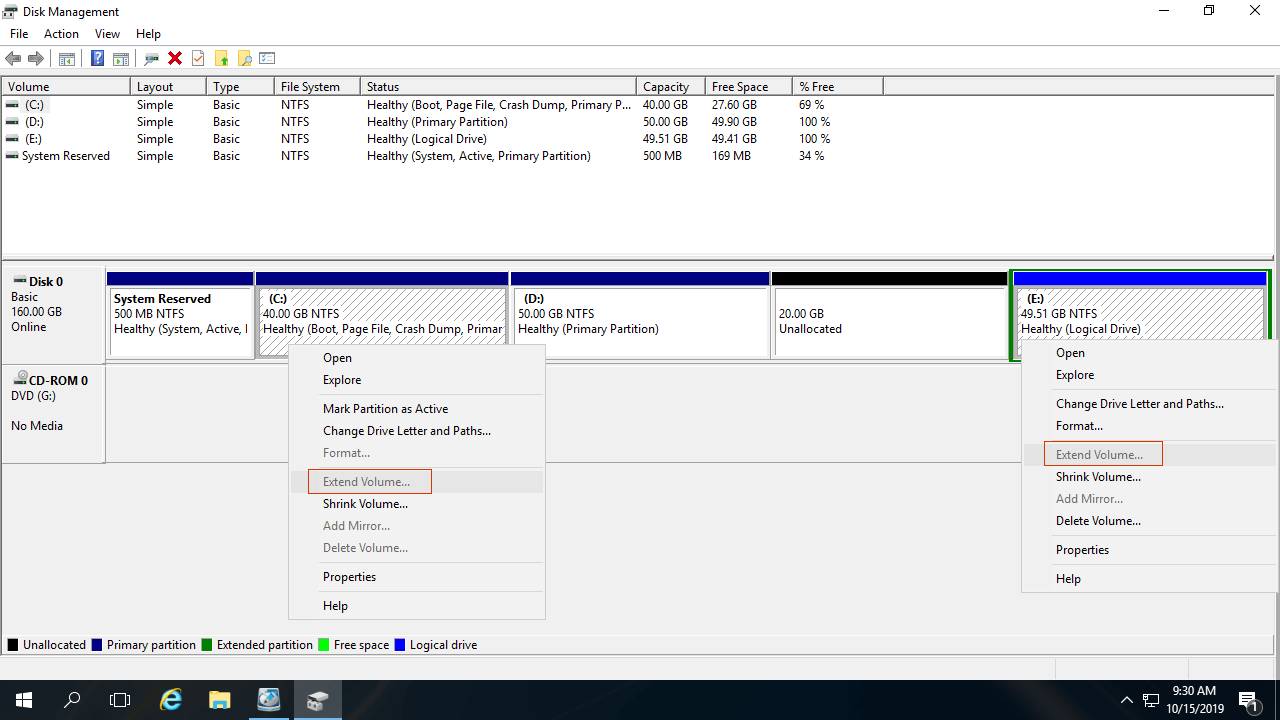
According to Microsoft's specifications, to extend a partition using the "Extend Volume" function, there must be adjacent unallocated space on its immediate right side. After shrinking the D drive via the "Shrink Volume" function, the unallocated space is created on the right side of D, rendering it non-adjacent to the C drive.
To resolve this issue, you can move partition D to the right side using NIUBI Partition Editor. This action shifts the unallocated space to the left side simultaneously, which successfully enables the Extend Volume option for the C drive.
How to move partition D in Windows Server 2016 to expand the C drive:
- Download NIUBI Partition Editor, right-click the D drive, select Resize/Move Volume, and drag the middle of this partition toward the right in the pop-up window. This moves the D drive block to the right and shifts the unallocated space to the left side.
- Right-click the C drive and select "Resize/Move Volume" again, then drag the right border toward the right side to merge the contiguous unallocated space.
- Click Apply on the top left to execute the operations. NIUBI is designed to work in a Virtual Mode first; real disk partitions will not be altered until you click Apply to confirm.
Watch the video guide below to see how to move partitions in Server 2016:
On certain servers, a Recovery partition or another type of small volume resides between the C and D drives. Before extending the C drive, you must also move this specific partition to the right side to make the unallocated space contiguous to the C drive. The operational steps remain identical when you need to move a Recovery, EFI, or OEM partition in Windows Server 2016.
How to Move Partitions to the Left or Right Side
If your goal is to shrink drive D in order to expand drive E, Disk Management is still unable to assist. However, with NIUBI Partition Editor, you can directly merge contiguous unallocated space into the E drive without moving any partition blocks.
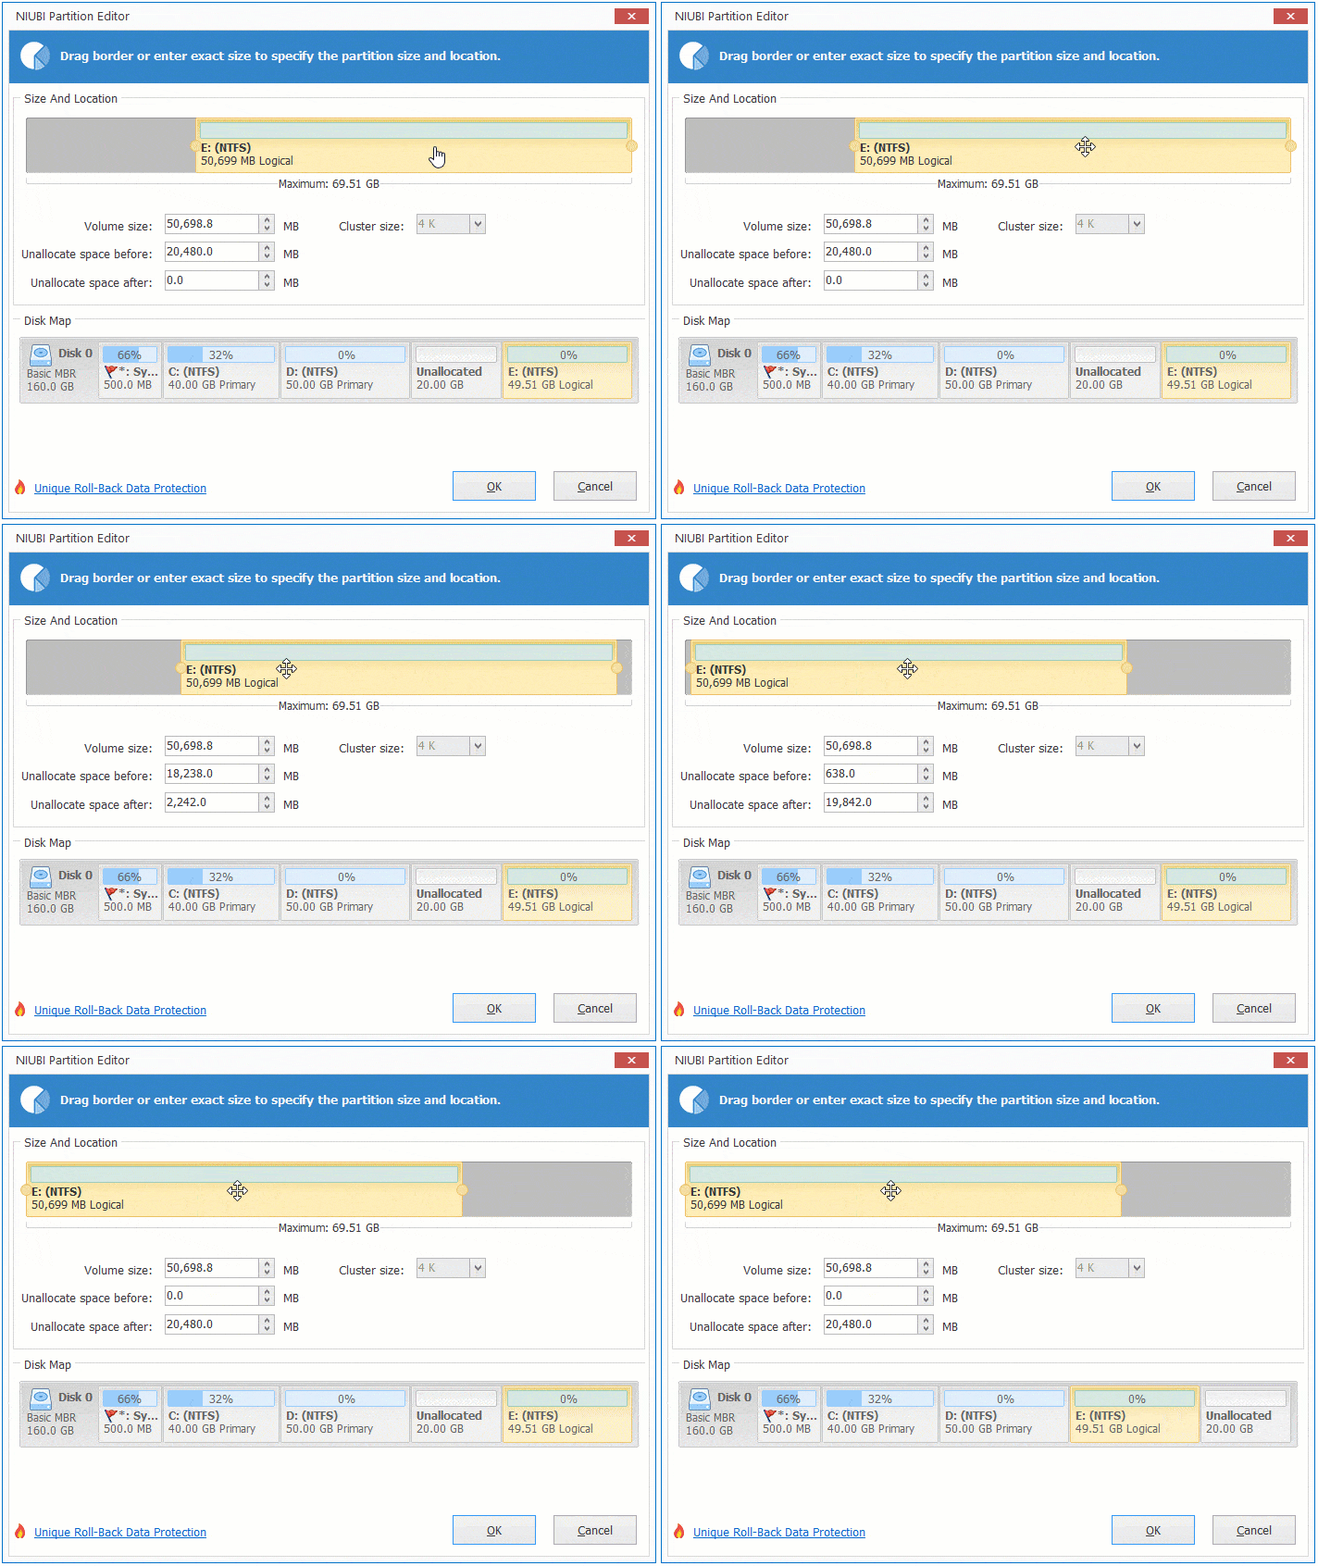
To do this, right-click drive E, select "Resize/Move Volume", and drag the left border toward the left side within the pop-up window:
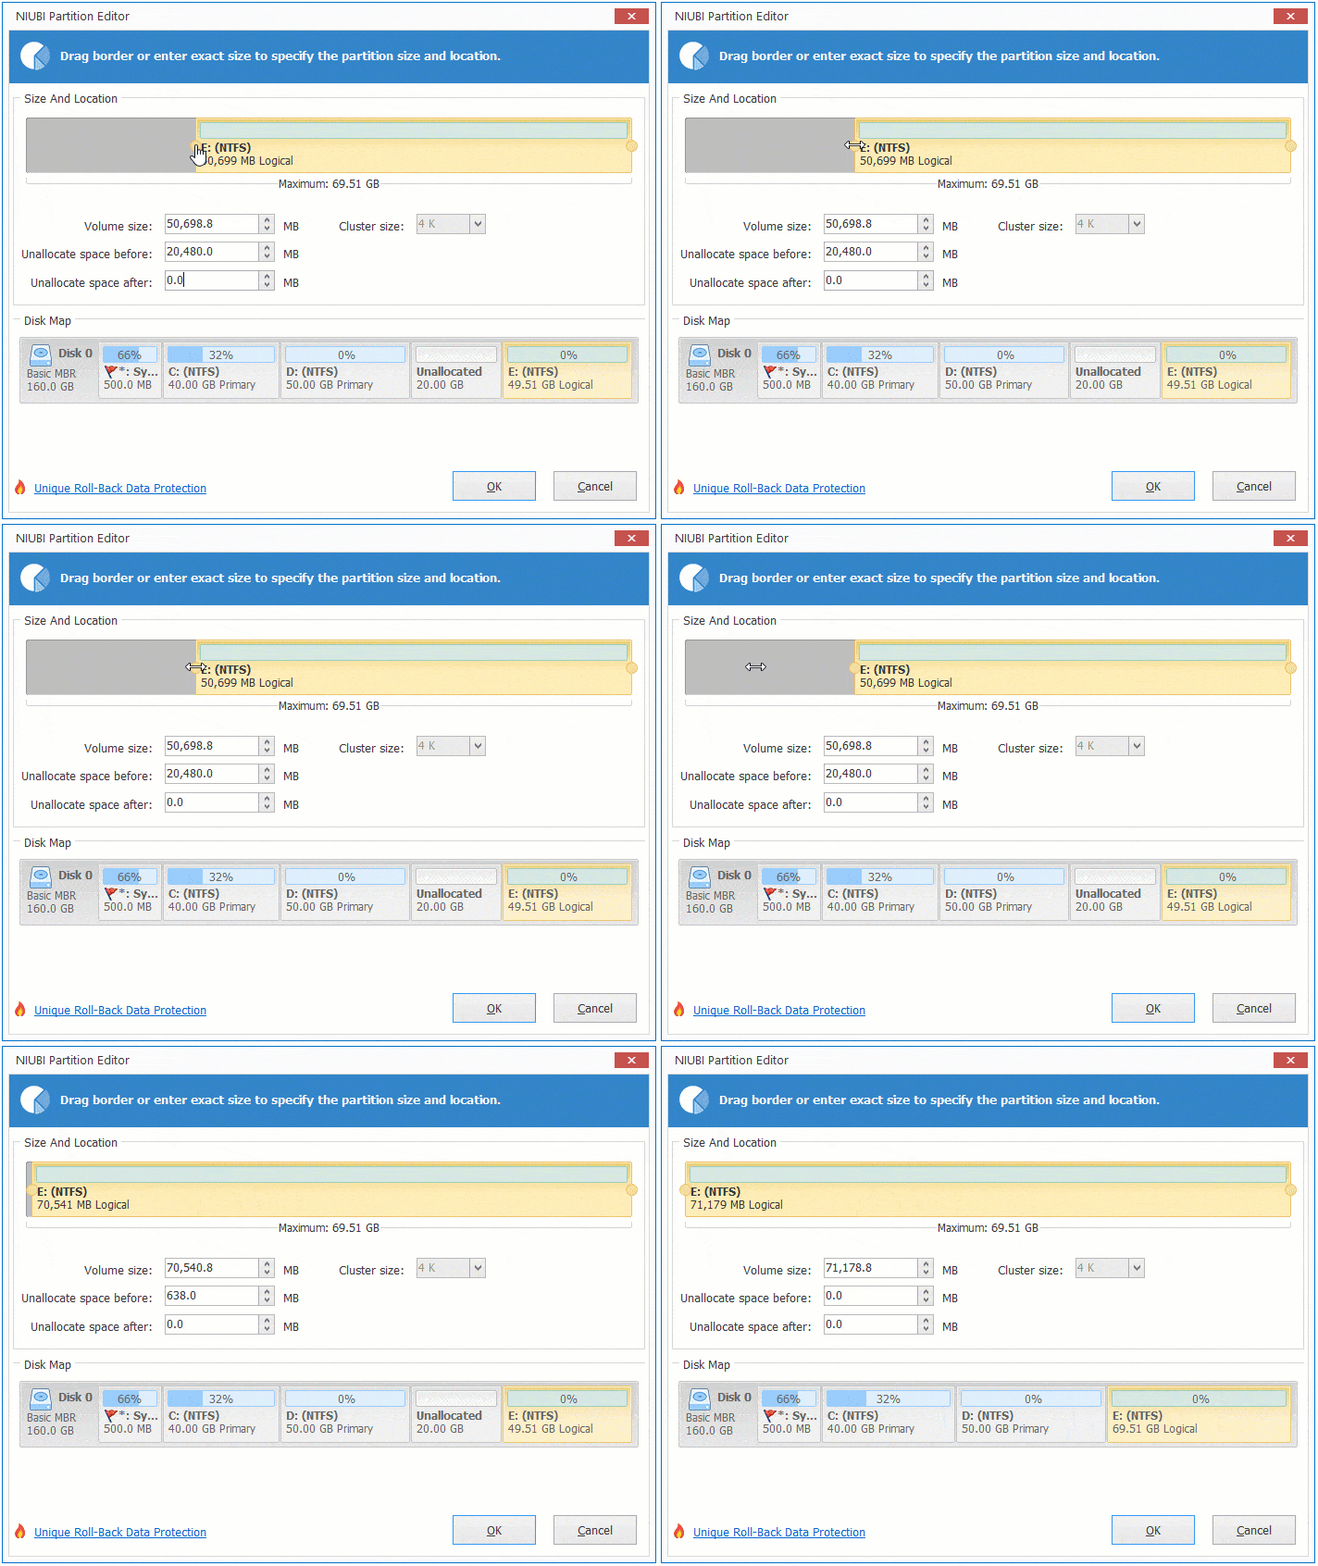
If another drive F exists on the immediate right side of E, you must move partition E to the left side before you can append this unallocated space to drive F.
How to move partition E to the left in Server 2016 without losing data:
Similarly, launch NIUBI Partition Editor, right-click drive E, and select "Resize/Move Volume". Position your mouse pointer in the middle of the E drive block and drag it toward the left side within the graphical pop-up window.
How to Fix Out-of-Order Partition Drive Letters
Sometimes, partitions may appear out of chronological order due to structural modifications, displaying, for example, as C, D, F, E on the disk bar.
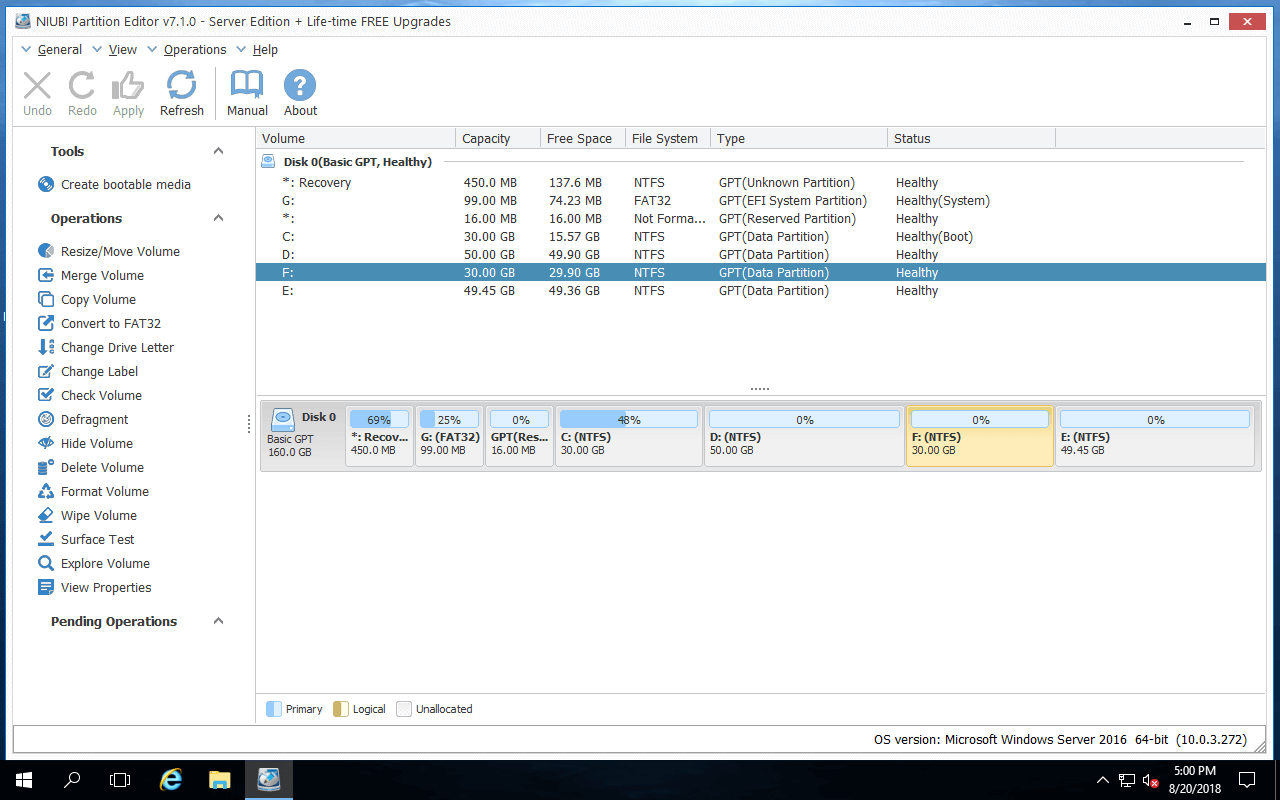
In this scenario, you can easily change the drive letters of volumes F and E without physically moving partition blocks. To do this, first right-click drive E, select "Change Drive Letter" in NIUBI Partition Editor, and temporarily reassign it to G or another available letter. Next, change drive F to drive E, and finally reassign the letter F to the original volume currently holding G.
How to Move a Partition to Another Disk
Occasionally, you may need to move a single partition or all partitions onto a separate hard drive. For example, if only the C and D drives exist on your system disk and you want to expand the C drive, but drive D lacks sufficient free space. In addition to cloning the entire disk to a larger one, you can copy partition D to an alternate disk, delete it from the original drive, and allocate its freed space directly to the C drive.
Steps to move a partition to another disk in Windows Server 2016 with NIUBI:
- (Optional) Shrink a volume on the destination disk to create unallocated space that is larger than the total used space of drive D.
- Right-click the original source partition (D), select Copy Volume, and pick the designated unallocated space in the pop-up wizard panel.
- Modify the size, location, and type of the target partition, then click Finish.
- Ensure no active system services are locking the drive before shifting letters. Right-click the original partition D, select Change Drive Letter, and change it to any other unused letter.
- Change the drive letter of the newly cloned partition on the target disk to D.
The operational guidelines are similar if you want to shift a partition to the very front or the very end of a disk layout in Windows Server 2016.
Watch the video guide below to see how to move partition to another disk:
In Summary
To move partitions in Windows Server 2016, the built-in Disk Management snap-in is ineffective. NIUBI Partition Editor allows you to complete this task rapidly and securely. Standing out from other solutions, NIUBI Partition Editor features innovative 1-Second Rollback, Virtual Mode, Cancel-at-will, and Hot-Clone technologies to thoroughly safeguard your system configurations and data. Beyond shrinking, extending, and shifting partitions in Server 2016, 2019, 2022, 2025, and older editions, this comprehensive utility assists you in performing numerous other disk layout optimization tasks.
 © 2009 - NIUBI Technology All Rights Reserved. |