Administrators frequently need to move partitions in Windows Server 2019/2022. For example, the "Extend Volume" option is greyed out for the C drive after shrinking D via Disk Management, because the Unallocated space is non-contiguous. This problem can be solved easily if you move partition D to the right. In other cases, server administrators may need to move the Recovery partition to the end of the disk. This article explains how to move partitions in Windows Server 2019/2022 safely and effectively.
1. Disk Management Cannot Move Partition in Server 2019/2022
Disk Management in Windows Server 2003 was limited to basic operations like creating, deleting, and formatting. Windows Server 2008 added the "Shrink Volume" and "Extend Volume" functions to help administrators resize partitions without losing data. However, it still has strict limitations.
Limitations of native Disk Management when changing partition sizes:
- It only supports shrinking and expanding NTFS partitions.
- It cannot change the starting position of a partition. Therefore, it cannot move a partition or shrink a volume towards the right side.
This is why the "Extend Volume" option is disabled for the C drive after shrinking the D drive. By using reliable partition software, you can move drive D to the right, making the Unallocated space contiguous to the C drive so it can be expanded seamlessly.

2. How to Safely Move a Data or Recovery Partition
Moving a partition requires rewriting its start and end positions, as well as moving all the files inside it. Therefore, there is a potential risk of data loss or system damage. Always back up your server first and use safe partition software. Compared to other tools, NIUBI Partition Editor provides unique data protection technologies:
- Virtual Mode – All operations are listed as pending for preview. Real disk partitions won't be modified until you click "Apply" to confirm.
- Cancel-at-will – You can cancel ongoing operations safely at any progress without losing data or damaging partitions.
- 1-Second Rollback – If any known error is detected while modifying partitions, it automatically reverts the server to its original status instantly.
- Hot Clone – Clone the system disk or data partition without interrupting the server. You can boot from the cloned disk immediately if the primary disk fails.
- Advanced file-moving algorithm – 30% to 300% faster when shrinking, moving, or cloning partitions.
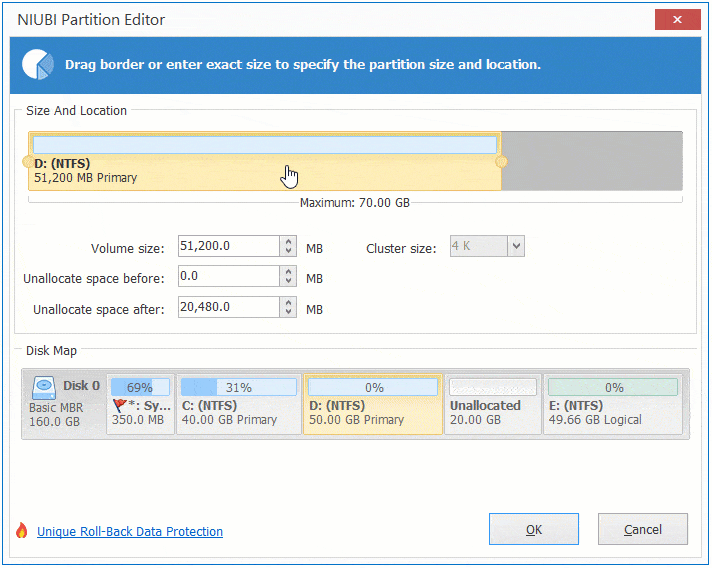
Steps to move partition D to the right in Server 2019/2022:
- Download NIUBI Partition Editor, right-click the D drive, and select "Resize/Move Volume".
- In the pop-up window, put the mouse pointer in the middle of drive D and drag it towards the right. Then, drive D will be moved to the right, and the Unallocated space will be moved to the left.
![Move Unallocated Space]()
- Click "Apply" on the top left to confirm and execute.
Watch the video to see how to move partition D and add Unallocated space to C drive:
How to move Recovery partition in Server 2019/2022:
In some servers, there is a Recovery partition in the middle of the C drive and Unallocated space. Before extending the C drive, you must move this Recovery partition to the right. The method is exactly the same as moving drive D. Just right-click the Recovery partition in NIUBI, select "Resize/Move Volume", put the mouse pointer in the middle, and drag it towards the right.
3. How to Move Partition to Another Disk
Sometimes you need to move a partition to a different physical disk. For example, if both the C and D drives are full, you can move partition D to another disk, delete the original D drive, and add its space to the C drive. Another efficient solution is cloning the entire disk to a larger one.
Steps to move a partition to another disk:
- Shrink a partition on the destination disk to create Unallocated space. (Ensure it is larger than the used space of drive D).
- Right-click partition D and select "Copy Volume", then select the Unallocated space on the destination disk.
- Edit the size and location of the target partition, then click "Finish".
- Right-click the original D drive, select "Change Drive Letter", and change it to any other letter.
- Change the drive letter of the copied partition to D.
If there are programs or services running from the D drive, simply changing the drive letter of the copied partition to D ensures that all applications will function normally from the new disk without reinstallation.
Beyond safely moving partitions in Windows Server 2019, 2022, and other versions, NIUBI Partition Editor provides a comprehensive toolkit to shrink, extend, merge, clone, convert, hide, and wipe partitions, as well as scan for bad sectors and optimize file systems.